
What Is a Picture’s DPI and How Can You Change or Increase it?
What is the DPI of an Image? In this modern world, there are many people who want to click pictures or take selfies from their smartphones or DSLR cameras. Most people prefer to take pictures and print them for decoration purposes.
There are many companies that like to print a big banner and use it for promotional purposes. When printing large posters, it’s really important that your image has a high DPI for the most efficient printing. DPI is Dots per inch, defines the clarity of the print. There are many ways to increase the DPI of the image.
What is DPI?
DPI stands for “dots per inch” and is a specification for adjusting and printing the print resolution of an image.
A print is made from millions of tiny ink dots. The DPI setting determines how many dots the printer leaves per square inch of the image. You need to understand how DPI works because it controls the two most important things in printing:
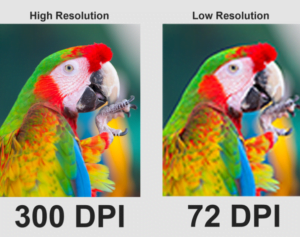
- The quality of your print. In simple terms, a higher DPI means a higher quality print. Most good home printers can output at 300dpi, and professional printers are much higher.
- The size of your print. A pixel in a digital image is equivalent to a dot in a print. So if you print an image that is 300 pixels wide at 1800 dots per inch, the printed image will be six inches wide. Print the same image at 180 dpi and it will be 10 inches wide.
How Does DPI Affect Your Prints?
Here is a picture to show. Below are two lines of 40 identical squares of the same size and color. Frames are less tightly packed in the top row, which equates to a lower DPI; and the bottom line is more tightly packed for a higher DPI.
The effect is obvious. On a lower DPI the line gradient is much less smooth. You can see clear edges against each of the squares. The line is also much longer.
On Higher DPI the line gradient is much smoother. Almost seamless. The line is also much shorter.
This shows you the balancing act you often have to do when adjusting the print resolution: size and quality. If you’re working with low resolution images, you need to strike a balance between the two.
Whenever possible, you should always save your work in as high a resolution as possible. Because resizing your image to enlarge will not improve print quality.
What DPI Should You Use?
All this begs the question: What is the best DPI for printing? The standard rule of thumb is that you should aim for 300 dpi . It’s a great quality for photos, and it’s questionable how much detail the human eye can discern beyond this level.
But don’t worry if your image is too small to print at 300 dpi. The intended viewing distance of the print plays a big part in the resolution you need. For images you hold on hand, such as photographs, brochures, or magazines, target 300 dpi or higher , but 250 at a time will suffice.
If you’re going to frame it with posters or pictures, you can get away with a lower resolution because you’ll mostly be looking from a few meters away. 200 dpi should be fine , even slightly lower. This also applies when printing on different materials such as canvas.
And such. The further you intend to look at your image, the lower you can set the resolution. A billboard banner designed to be seen from across the street can be printed at as low as 20 dots per inch .
How to Check the DPI of a Picture
To find the DPI of an image in Windows, right-click on the filename and choose Postings > Details . You will see the DPI in the section labeled Image Horizontal Resolution and Vertical Resolution . On Mac, you need to open the image in Preview select Tools > Adjust Size . labeled solution .
How to Increase Image’s DPI with Fotophire Maximizer
Fotophire Maximizer is one of the best tools for people who love to take refined photos that they can share on their social media accounts and other profiles. This tool is easy to use and comes with a number of features with which you can retouch your photos. There are 3 modules and one of them can easily make the desired changes.
You can delete unwanted objects in the photo, crop with one touch, restore old photos, correct their colors and add more than 200 effects to the photo.
Key Features of Fotophire Maximizer
- The program offers you 8x zoom settings.
- Enhanced edges for an extremely clear picture.
- Large, enhanced DPI photos for better printing.
- Drag and drop user friendly interface for editing.
- Color correction to make photos more realistic.
How to Increase Image’s DPI with Fotophire Maximizer
Many people wonder how to increase the DPI of an image? In this modern world, it’s really easy to increase the DPI of an image with Fotophire Maximizer.
Step 1: Install and Launch Fotophire Maximizer
Download and install the program on your system. After that launch it and add the photo to Fotophire Maximizer whose DPI you want to increase. You can add them to the program by dragging and dropping, or you can click the open button to add the files.
Step 2: Increase Picture’s DPI
After the photo is added, you can enter the new DPI value you want in the text box to increase the DPI of that particular picture without even degrading the quality of the picture.
Step 3: Save Changes
When the DPI of the photo is increased according to your wish, you can finally save your photo and increase the DPI of the picture according to your need. You can easily download the new image to your system.
Added bonus: After using Fotophire Maximizer to increase the DPI of images, your images should be of high quality. In such a case, if you want to memorize these images even better and keep them forever. There is a solution here. It has released a new product called Wondershare. Fotophire Slideshow Maker .
It can let you create a customized slideshow in seconds. There are lots of templates and free music to choose from according to your desire.
Part 2. How to Increase Image’s DPI in Photoshop
How to increase the DPI of the image is not such a simple task and this is why most people prefer to use Adobe Photoshop to increase the DPI of their images. Adobe Photoshop is a tool that allows the user to make any necessary edits to the photo. DPI affects printer resolution as the printer understands dots per inch to print anything on paper. The standard DPI used these days is 300 DPI.
How to Increase Image’s DPI in Photoshop
Step 1: Import Photos from Computer
Open the Adobe Photoshop program installed on your system and add the images whose DPI you want to increase. You can add files by clicking the File tab and selecting “Open” from the menu. A dialog box will open where you can select the photos whose DPI needs to be increased.
Step 2: Choose Image Size Option
To increase the DPI of an image, you need to click on the “Image” tab and select the “image size” option. You can make the settings and settings you want to make in the photo.
You can adjust the width and height of the picture according to your needs, as well as increase or decrease the resolution of the picture by entering a value in the resolution box. You can change the value from 72 to 300 to increase the DPI.
Step 3: Save Changes
After you finish increasing the DPI of your picture, you can save your picture with the increased DPI on your local computer.
Part 3. How to Increase Image’s DPI on Mac
There are many Mac users all over the world these days. It is also very easy to resize or increase the DPI of the image on Mac and you can do it on your own without using any photo editor.
You can easily resize photos individually or even in bundles with the help of Mac OS. So, if you are wondering how to increase the DPI of images on Mac, Gimp image editor can help you in your task.
GIMP DPI Developer
Gimp developer is a program with which you can easily increase the DPI of the image on your Mac PC. Changing the size, DPI of the image is very common these days as most of the people want to use the image in their own way. Gimp can help you increase or decrease the DPI of the image according to your needs. The program is very easy to use and anyone can make changes according to their needs.
How to increase the DPI of an image on Mac
Step 1: Add Image to the Program
The first thing you should do is add the files to the program to increase or decrease the DPI of the picture. Open the program and click the “File” tab to add the images to the program. After the file is attached, you can click on the “Image” tab to access the “print size” option to scale your image to suit your needs. The print size option gives you the default width and height of the image.
Step 2: Adjust Image Resolution
You can easily adjust the width and height of the photo and also change the x and y pixels to increase or decrease the DPI of the Image. If you want to increase the size of the image, you must change the value by the same proportion as that of the original image. If you want to increase the DPI, you must increase the value in the X resolution and Y resolution box. If you want to decrease the DPI of the image, you should decrease the value in the X resolution box and the value in the Y resolution box.
Step 3: Save Changes
Once you have finished rescaling your image, you can choose to click the “OK” button to save your increased DPI image. You can save it on your Mac PC and use the scaled image according to your needs.
Part 4. How to Increase Image DPI on Mobile
There are many people who do not want to change the DPI of the image on any PC or laptop. Most people like to edit the picture on their mobile phones. There are many people who can’t wait to edit their photos on the go and share them on various social media platforms.
So, if you are looking forward to increasing the DPI of your image, you can do so easily with various smartphone apps. Many such applications are available in Google Play Store and Apple Store.
Image Resizer+
Image resize is an application that you can choose to use according to your needs. It is an image editing application available on Apple Store and iPhone users can easily use this application to increase or decrease the DPI of their pictures. These apps allow you to easily change the DPI of your image from the mobile phone itself. You can crop images, resize image and edit image easily.
How to Increase Image’s DPI on Mobile
Step 1: Launch App and Add Image
First, you have to launch the app on your iPhone and tap on the photos option, which will show all the photos on your mobile screen. You can choose the photos whose DPI needs to be changed according to your needs.
Step 2: Adjust Image Resolution
After selecting the photos you want, you have to swipe the screen to the right to bring up the editing menu so that you can resize the picture according to your needs. The app gives you the ability to resize the image in two ways, first using the percentage option and second using the pixel option.
You can adjust the resolution according to your needs by entering the percentage sizes. While feeding the value, the app will resize your image according to these values and the DPI of the photos will be changed accordingly.
Step 3: Apply Changes and Save Image
After entering your photo resize value, you need to tap on the Resize button to resize your image according to your needs. Tapping the resize button will change the DPI of your image and you can save the photo in your mobile. You can also share photos directly from your phone with other people.
Conclusion:
There are many options where you can change the DPI of the image on Windows PC, Mac PC, Android smartphones and iPhones. But the problem is, for each platform you have to use various image enhancers that can make it easy for you to change the DPI of your image.
So, if you want to save yourself from all this hassle and complexity, you can choose to go with Fotophire Maximizer, which can easily increase or decrease your image’s DPI for most desktop or mobile platforms.
